10 Essential Tips for Using Fluorescent Paint on Walls?

Fluorescent paint can transform your space in unique ways. Using "Pintura Fluorescente Pared" adds vibrancy to dull walls. This paint glows under black light, offering stunning visual effects. Whether for a party or to create a lively atmosphere, it stands out.

However, applying fluorescent paint requires careful planning. It might not adhere well on all surfaces. The color intensity can vary based on the base coat. Preparation is key to avoid disappointment.

Understanding the nuances of this medium is essential. Choose the right primer to enhance the glow. Experimenting with different techniques can yield unexpected results. Don't rush the drying process; patience is crucial. With these tips, your walls can become a canvas of radiant imagination.
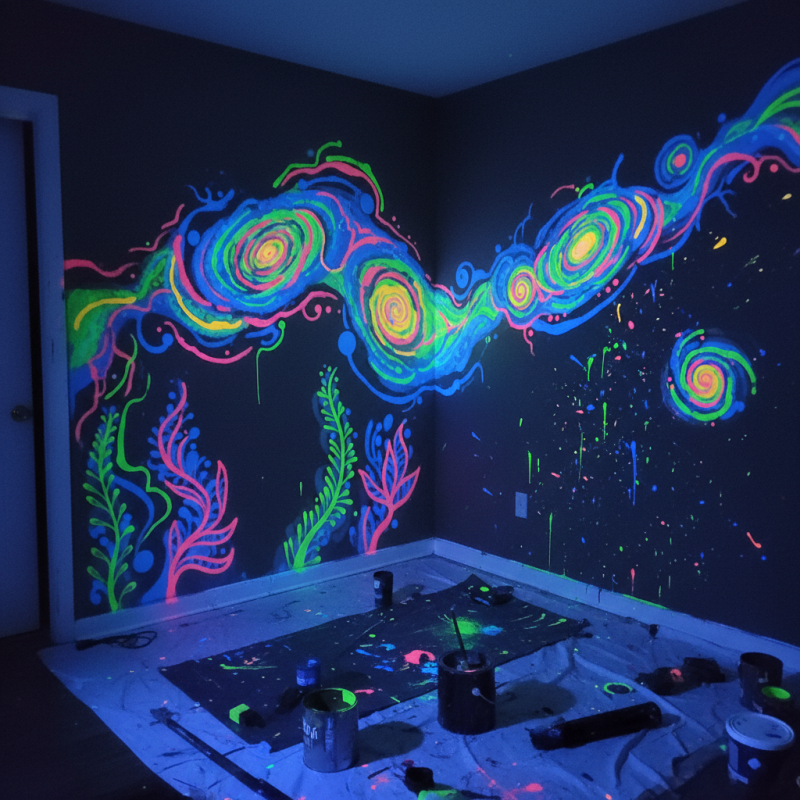
10 Essential Tips for Using Fluorescent Paint on Walls?

Choosing the Right Fluorescent Paint for Your Walls

When selecting fluorescent paint for your walls, consider the location and lighting. Different rooms have unique needs. A vibrant hue may shine in a playroom, while a subtler shade suits a bedroom. Assess your environment to ensure the paint enhances rather than overwhelms.

Color choice is crucial. Some fluorescent paints can look stark under certain lighting. Test samples in various light settings. Seeing them at different times of day can reveal unexpected results. You might love a shade in the shop but regret it at home.

Longevity matters, too. Some fluorescent paints fade quickly. Investing in quality can save you from repainting sooner than desired. Check user reviews for insights on durability. Prepare to adjust your choices based on real-life usage, not just aesthetic appeal.

Preparing Walls for Optimal Adhesion of Fluorescent Paint

Preparing walls for optimal adhesion of fluorescent paint is essential for achieving vibrant, long-lasting results. A well-prepared surface not only enhances paint performance but also minimizes issues like peeling or fading. According to a report from the National Paint and Coatings Association, nearly 30% of paint failures arise from poor surface preparation. Taking the time to properly prepare your walls can significantly impact the final outcome.


Begin by cleaning your walls thoroughly. Dust, grease, and stains can create barriers between paint and surface. A simple mixture of warm water and mild detergent often does the job. Allow the walls to dry completely afterward. Use fine-grit sandpaper to smooth out any bumps or imperfections, as a smoother surface allows for better adhesion. Test the wall's texture; it shouldn’t feel too rough or too slick.


When applying fluorescent paint, consider the type of primer used. A high-quality, white primer can enhance brightness and coverage. A discussion led by experts in the industry highlights that applying a coat of primer can improve adhesion by up to 50%. Achieving the right texture can be tricky, so don’t hesitate to make adjustments based on your observations during the process. Remember, attention to detail is paramount for the best results.

Application Techniques for Even Coverage of Fluorescent Paint

Fluorescent paint can transform a space, but applying it evenly requires skill. Start by preparing your wall with a smooth surface. Fill any cracks or holes to avoid disruptions. Use a primer suited for fluorescent paint, enhancing brightness and ensuring better adhesion.

When applying the paint, consider using a high-quality brush or roller. A foam roller can help achieve an even application. Work in small sections to maintain a wet edge, preventing streaks. Thin layers are crucial; thick coats can lead to drips and uneven color.

Pay attention to lighting while painting. A well-lit area helps spot imperfections. Inspect your work regularly. If areas seem patchy, be prepared to retouch them after drying. Keep in mind that fluorescent paint reacts differently in various lighting conditions, so test a small area first.

Lighting Considerations to Enhance Fluorescent Paint Effects

Fluorescent paint can transform any room, but lighting plays a crucial role in revealing its vibrant effects. Using blacklights or UV lamps can enhance the brightness of these paints significantly. A study from the Journal of Architectural Lighting indicates that proper lighting can increase the visibility of fluorescent colors by up to 60%. This makes choosing the right lighting essential for achieving the desired impact.

Consider the positioning of your lighting fixtures. Wall-mounted lights or sconces can create striking shadows and highlights. If you're using fluorescent paint in a kids' room, flexible LED strip lights can add depth and whimsy. Remember, the reflections and angles greatly influence how colors appear. Experimenting with different light sources can yield surprising results.

When applying fluorescent paint, ensure even coverage. Uneven layers can lead to patchy effects under certain lights. It is suggested that a primer is used first to create a unified base. For best results, consult techniques from professionals or detailed guides on fluorescent applications. Always test small areas before committing to larger patches. This trial can help achieve balance and a more polished look on your walls.

Safety Precautions When Working with Fluorescent Paint

When working with fluorescent paint, safety is crucial. Start by wearing protective gear. Use gloves to avoid skin contact. A mask will help prevent inhaling paint fumes. Additionally, safety goggles shield your eyes from splashes. Ensure your workspace is well-ventilated. Fresh air reduces the buildup of harmful vapors.

Before you begin painting, prep your walls carefully. Clean the surface to remove dust and debris. Patch any holes, as smooth surfaces yield better results. Be aware of your surroundings. Keep flammable materials away from your work area. Accidents can happen quickly, and caution is always wise.

Remember to read the paint label. Understand drying times and recommended methods. While fluorescent paint can be fun, be mindful of the potential for spills. Cleanup can be messy and tricky. Sometimes, even the best prep can lead to unexpected outcomes. Reflect on your process after finishing. Each project is a learning opportunity.

X
We use cookies to offer you a better browsing experience, analyze site traffic and personalize content. By using this site, you agree to our use of cookies. Privacy Policy
Reject Accept

Leave a Message to Download Our Brochure

X